 1. In Fireworks MX, create a new canvas 300x200. Add a simple text block and apply a drop shadow. Nothing too fancy. Don't worry about the size of the text or canvas. We will fix that in a minute.
This is a beginner's Fireworks MX tutorial. Basic knowledge of Fireworks MX assumed. This tutorial was written using Windows O/S.
This tutorial is not going to get too deep into writing complex commands, but it will show you the basics of saving some simple time saving commands that will make your designing easier.
Let's experiment.
1. In Fireworks MX, create a new canvas 300x200. Add a simple text block and apply a drop shadow. Nothing too fancy. Don't worry about the size of the text or canvas. We will fix that in a minute.
2. Save the .png file in a separate folder on your hard drive.
 3. Keeping the same exact fill color and drop shadow, edit the text to a new word or phrase. Save As a newly named file (in the same folder as the first png file.) It doesn't matter what you edit the text as, it is just experimenting.
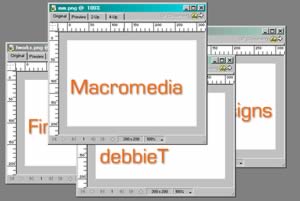
4. Repeat this process two more times, changing the text and saving as new files. There should be four .png files saved.
Close all files on the workspace except one of the text files. It doesn't matter which one is open.
5. View the History Panel - Windows>History. (Shift+F10)
If there are commands in the History, then clear them by clicking on the Options Menu (little menu icon on top right of panel) and choosing "Clear History."
The History Panel should be blank.
6. Choose Modify>Fit Canvas then choose File>Save.
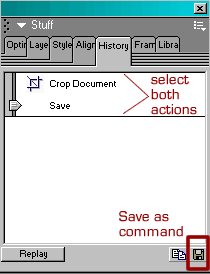
7. Check the History panel, there should be two commands listed now. The action for Crop Document (Fit canvas) and the Save action.
Select both actions - click on the first command, then while holding the shift key, select the other.
8. At the bottom of the History panel click on the "Save As Command" icon. (you also can choose Save As Command from the Options menu on the History panel.)
Type in a descriptive name for the command.
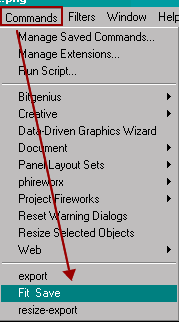
The new command has been saved and ready to reuse from the Commands menu.
Tip: To delete a saved command, choose "Manage Saved Commands" and you can rename or delete any saved scripts.
Okay, are you ready to try an experiment in Batch Processing using our new command?
9. Choose File>Batch Process. The Batch wizard will open.
10. Browse to the folder where your text files were saved. Select the files and click the "Add" button. (You can select each one separately or select all at once.)
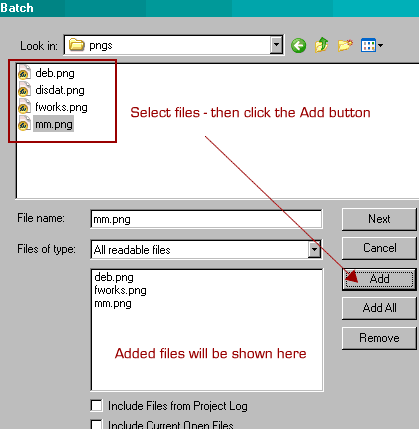
No need to check the boxes for files "From Project Log" or "Current Open".
11. Once all the files for the batch have been added, click the Next button.
12. On the next dialog window, you will find the options to include for the batched files.
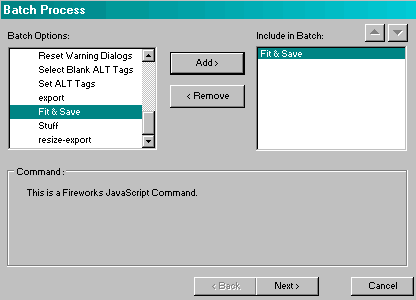
On the left menu (Batch options), click the + next to "commands" to show the full menu of all available commands. Highlight/select the command you saved earlier. Mine is named "Fit & Save" Click the "Add" button to include that command to the batch.
13. Let's add another option to the batch. How about if we export each of the graphics as Gifs?
Highlight/select Export on the left menu, then click the "Add" button to include it on the menu on the right.
14. At the bottom area of the dialog window, you can customize the export options. Click the "Edit" button to open the Export Preview window. Choose the appropriate file format (gif), palette, color settings, and/or pre-saved setting. I am using a pre-saved setting of 16 colors.
Click "OK" button.
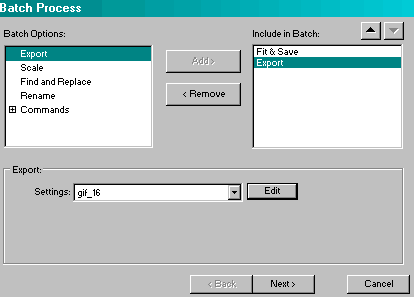
16. At this time, you will have two commands for our batched files. Always make sure your batch options/commands are in the appropriate order. Export should be done after the command script. There are "up" and "down" arrows to reposition the order of commands.
Click the "Next" button.
17. On the next dialog window, choose the location for the new files to be saved in. If you want the files to be saved in the same location as the original files, choose the first option. For a custom location, browse to the folder.
18. The bottom area of the window is for backing up the original files. If you want to use only one set of backups, choose the first setting. It will keep one set of backups and overwrite any existing backup files.
Incremental Backups will create a backup for each batch operation. In this case, choosing either option will have the same results. This is the first batch process for these particular images.
Using either backup setting will also move your original .png files to a newly created folder named "Original Images".
Uncheck the Backups option if you don't need it. I don't normally use it.
19. If you would like to use the same options for this batch again in the future, there is an option to save the Script. Name the script a descriptive name. If you plan on using scripts frequently, it is a good idea to start a new folder just for scripts.
20. Click the "Batch" button to start. You will see activity on your Fireworks workspace. Images will open and close quickly.
Then a message will appear telling you that the Processing was finished normally.
21. Now browse to the folder to view the original pngs. They should be cropped. There should also be exported GIF files.
More on Batch Processing - For Photos.
Page updated on July 9, 2003
[Home] [Contact debbieT] [Free Backgrounds] [Xhtml & CSS Tutorials]