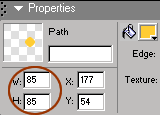
2. Create a circle shape on the canvas. 85x85. On the Property Inspector, the precise dimensions can be set.
Fill with a bright yellow with a feather edge of 2. No stroke.
This is a beginner's Fireworks MX tutorial. Basic knowledge of Fireworks vector shape tools is assumed. This tutorial was written using Windows O/S.
Before we get down to the actual animation instruction, first let's go over some general information. Animation uses frames. Each frame has the same amount of layers. If you have 3 layers and you add a frame, that new frame will also have 3 layers. The content on each frame's layers might not necessarily be the same, in fact you might have blank layers on some frames.
The frames play in numerical order, showing movement on the computer screen. You can control the speed of your animation by editing the timing. But remember that this timing is only approximate. Which browser your visitor is using and how fast their system is will also effect the speed of the animation. So just remember, just like everything else on the web, it is not an exact science.
One more thing to mention about animation is file size. Do I hear groans? Animated GIF files are much larger in size than ordinary GIF files. But with the Optimization tools that Fireworks MX offers, you can create sleek, fast loading animation. Keep your colors to a minimum and your animation should be terrific! imported JPGs or photos with lots of details will make larger animation files. If you have to use a photo in your animation, try blurring it slightly and reducing the physical size. Blocks of solid color and horizontal lines are the best way to keep your file size down to a minimum. Try to keep each animation under 20kb, and your visitors will be happy to view them.
Time to get started.
1. Create a new canvas in Fireworks - 300x200 - blue canvas color.
2. Create a circle shape on the canvas. 85x85. On the Property Inspector, the precise dimensions can be set.
Fill with a bright yellow with a feather edge of 2. No stroke.
3. View the Layers panel (Window>Layers). Rename Layer 1 "Sun circle" - Check the box for "Share Across Frames".
Tip: Rename a layer by double-clicking on the layer name and typing in a new name.
A little icon ![]() will appear next to the layer name. This means that the sun object is shared among all your frames. If you move or edit the circle, the changes will also be made to all the frames. This option is great for any static objects in your animation. When you add more frames, the sun circle will automatically be added to the new frame.
will appear next to the layer name. This means that the sun object is shared among all your frames. If you move or edit the circle, the changes will also be made to all the frames. This option is great for any static objects in your animation. When you add more frames, the sun circle will automatically be added to the new frame.
4. Click on the New/Duplicate Layer icon at the bottom of the panel - rename the layer "rays" (note: we are still only working with one frame at this point)
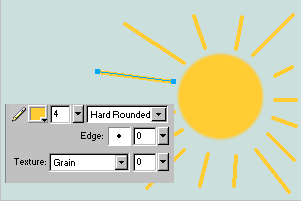
5. On the "rays" layer, use the Line Tool to create matching bright yellow lines for the rays of light coming from the sun object. I used a hard rounded line.
6. View the Frames panel (Window>Frames) - there should be just one frame in the panel.
Click the Options menu ![]() found at the top of the panel, and select Add Frames.
found at the top of the panel, and select Add Frames.
When the Dialog box appears, choose 3 for number of frames and insert them after the current frame.
You will now have a total of four frames in the panel at this point. Click on each frame. Notice that each one has 2 layers. The "sun circle" layer (which is shared among all frames) and the rays layer (which will have no objects on it as of yet)
7. Activate Frame 1, and click on the "rays" layer in the Layer panel. All path objects on that layer will be selected.
8. While all the ray paths are selected, choose Edit>Copy.
9. Activate Frame 2, on the "rays" layer, choose Edit>Paste. The ray paths will be placed in the exact position as they were in frame 1.
Paste the ray paths to the next two frames as well.
Note: You might wonder why you couldn't just "share" the rays layer as with the sun layer. The sun is going to stay the same through out the whole animation, but the rays are going to change.
10. Starting with Frame 2, activate the "rays" layer. Using the Sub-Selection tool, edit the length of each ray by moving the vector points. Drag the point to lengthen or shorten the path. (The sub-selection tool is the white arrow tool next to the black arrow selection tool.)
This can also by accomplished by using the scale tool as well.
Edit the ray lines on each of the other two frames as well. You don't have to edit each and every ray path, but try to change each frame differently so it will work as an animation.
11. To check your animation progress, you can play the animation using the VCR controls on the image window.
![]()
Tip: If the VCR controls are not viewable, you probably have your image window maximized or out of view. The controls are at the bottom of the image window, so if the window is too large, the controls might be under the workspace toolbars.
12. Let's slow the animation down a little bit.
By default the animation timing is 7/100 of a second. You will see this timing number on the frame panel next to each frame name. Each frame's property can be edited separately, or if you want the same changes for more than one frame, those frames can be selected together and edited together.
Click to select Frame 1. While holding down the Shift key, click on Frame 4.
Frame 4 plus all frames in between are selected. This comes in handy when you have many frames to select at once. You can also use the Ctrl key to select multiple frames not in succession.
13. While all frames are selected, click the Frame panel Options Menu ![]() . Choose Properties.
. Choose Properties.
Type in a new timing delay of 20, then hit the Enter key. All four frames now should have the timing delay of 20. Use the VCR controls to test the movie again. Satisfied? Too slow? Change the properties for all the frames again, or you may also opt to set a different timing value for each frame. To change only one frame's properties, double-click on the frame delay number (on frame panel.)
14. Okay, time to optimize and export.
View the Optimize panel (Window>Optimize)
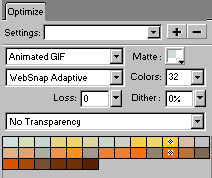
Choose "Animated Gif" as the File Format. Reduce your colors to the lowest amount without compromising quality.
15. Choose File>Export and browse to the folder you would like your animated gif saved into. Make sure you are choosing "Images Only" as Type.
Here is my final animated graphic - I added a block of vertical text.

I hope you have enjoyed this tutorial.
Thanks!
debbieT
Page updated on August 19, 2003
[Home] [Contact debbieT] [Free Backgrounds] [Xhtml & CSS Tutorials]